Change your authoritative nameservers (Full setup)
If you want to use Cloudflare as your primary DNS provider and manage your DNS records on Cloudflare, your domain should be using a full setup.
This means that you are using Cloudflare for your authoritative DNS nameservers.
Step 1 — Do you already own a domain?
Yes
If you already own a domain and want to use Cloudflare for your authoritative DNS, proceed with this tutorial.
No
If you do not already own a domain name and plan to use Cloudflare for your authoritative DNS, we highly recommend purchasing your domain name through Cloudflare Registrar .
Using Cloudflare Registrar simplifies your setup process by automatically using Cloudflare for authoritative DNS.
Step 2 — Complete prerequisites
Create an account
Before you can complete your domain setup, you need to create an account and add your domain to Cloudflare.
Disable DNSSEC
If you are onboarding an existing domain to Cloudflare — as opposed to purchasing a new domain through Cloudflare Registrar — make sure DNSSEC is disabled at your registrar (where you purchased your domain name). Otherwise, your domain will experience connectivity errors when you change your nameservers.
Why do I have to disable DNSSEC
When your domain has DNSSEC enabled, your DNS provider digitally signs all your DNS records. This action prevents anyone else from issuing false DNS records on your behalf and redirecting traffic intended for your domain.
However, having a single set of signed records also prevents Cloudflare from issuing new DNS records on your behalf (which is part of using Cloudflare for your authoritative nameservers). So if you change your nameservers without disabling DNSSEC, DNSSEC will prevent Cloudflare’s DNS records from resolving properly.
Step 3 — Update your nameservers
Once you have added a domain (also known as a zone) to Cloudflare, that domain will receive two assigned authoritative nameservers.
Get nameserver names
-
Log in to the Cloudflare dashboard and select your account and domain.
-
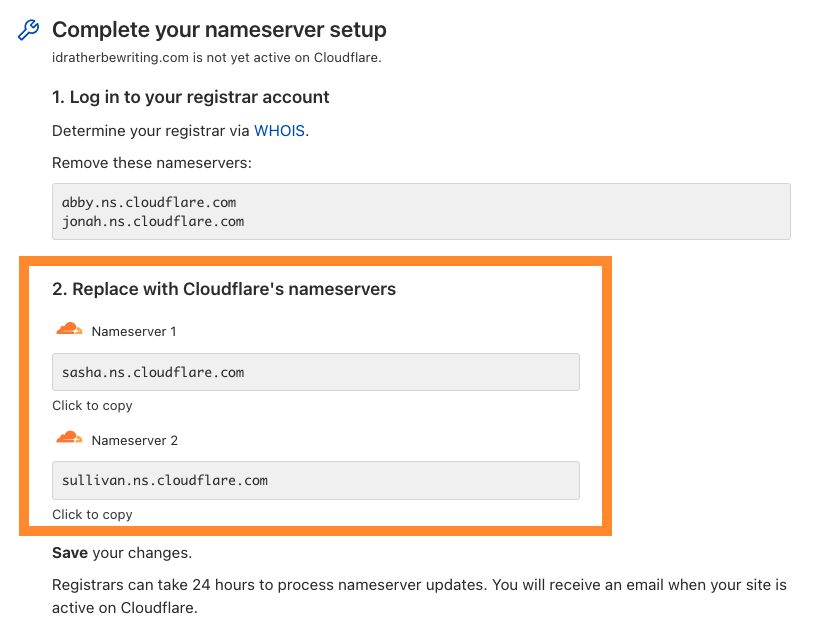
On Overview, copy the information from Replace with Cloudflare’s nameservers.
Update your registrar
-
Log into the admin account for your domain registrar. If you do not know your provider, use ICANN WHOIS.
-
Disable DNSSEC for your domain.
-
Remove your existing authoritative nameservers.
-
Create new authoritative nameservers. If their names are not copied exactly , your DNS will not resolve correctly. For additional details, refer to provider-specific instructions .
-
Wait 24 hours while your registrar updates your nameservers. You will receive an email when your site is active on Cloudflare.
Verify changes
To check whether you correctly changed your nameservers, you can log in to the Cloudflare dashboard or use a third-party tool.
If you see unexpected results, refer to Nameserver FAQs .
Step 4 — Re-enable DNSSEC using Cloudflare
When you updated your nameservers, you should have also disabled DNSSEC at your registrar.
You should now enable DNSSEC within Cloudflare to protect from domain spoofing.
Provider-specific instructions
This is not an exhaustive list of provider-specific instructions, but the following links may be helpful:
- 1and1
- 101Domain
- Amazon
- Blacknight
- BlueHost
- DirectNIC
- DNSMadeEasy
- Domain.com
- Dotster
- DreamHost
- EasyDNS
- Enom
- Fast Domain
- FlokiNET
- Gandi
- GoDaddy
- Google Domains
- HostGator
- HostMonster
- Internetdbs
- iPage
- MediaTemple
- MelbourneIT
- Moniker
- Name.com
- NameCheap
- Network Solutions
- OVH
- Porkbun
- Rackspace
- Register
- Site5
- Softlayer
- Tucows
- Yahoo!
- Yola